Registering replication appliance to vCenter fails with “no element found: line 1, column 0”

Registering replication appliance to vCenter fails with “no element found: line 1, column 0”

Cause: Corrupt/missing ovfenv.xml

Log on to the vR appliance console session and run the below command:

ls -lth /opt/vmware/etc/vami/

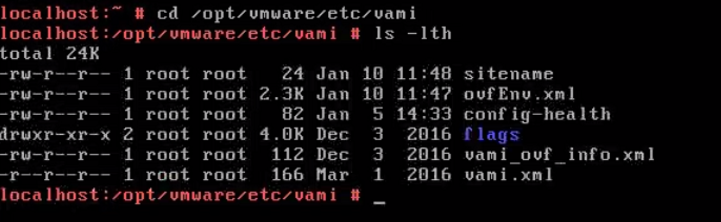
f the ovfenv.xml is 0, power down the replication appliance and power (do not perform a guest restart) this back up using the web client (must be powered up on the web client)

If the file still does not regenerate, you will re-deploy the replication appliance.

VMware Pubs::

https://docs.vmware.com/en/vSphere-Replication/6.1/com.vmware.vsphere.replication-admin.doc/GUID-0D980B0A-44B4-4644-BB26-4E100727D6BD.html

  1. If powering the vSphere Replication appliance does not resolve the issue, most certainly the appliance has been temporarily removed and re-added in the vCenter Server. There is no solution for restoring the OVF environment in that case. You must re-deploy the vSphere Replication appliance by using an empty database, and configure all replications from scratch.

Setting up replication using existing seeds/reverse replication

Before proceeding, Ensure there are no stale replications. The VM name must not be listed in the vCenter server>Monitor>Vsphere replication>(on the source) outgoing,  incoming tab (for the destination)

Configuring replication using existing seeds are rather simple.  Configure replication like you normally would except, you would select the datastore>Folder where the source VM’s virtual disk’s are located.

Configure replication:

Select target site:

Select VR server:

Click on Edit for the VM

Select Datastore>VM folder where the disks are located

for the vR to detect the disk as seed, the Disk name must be identical to that of what is on the source side. you will see the below message when it picks up the seed.  Click on “use existing” to use the seeds

Click on use all seeds

Proceed with the wizard

The status of replication is expected to be “initial full sync” however if you click on the i icon as highlighted below, you will see it doing a checksum.

The replications should resume once the checksum has been compared

One the checksum is completed, the state should go back to ok

Recovering a VM using vSphere replication

Log into the recovery site vCenter webclient>vCenter server>Monitor>vSphere replication>incoming replication>

Click on the VM that you wish to recover and click on the recover button: 

Should you be performing a planned migration of the VM (with the most recent change, select Synchronise recently change (you will need to authenticate with the source side vCenter) ,. Else, use the latest available data or point in time to recover to a point in time snapshot

in my  scenario, the source site was down and  the VM needs to be recovered on the DR,

Now the VM has been recovered and is running at the DR site

Deploy vSphere replication using OVF tools

The web client/client integration plugin is such a pain to get working!! Especially when you have to rebuild one of the vR appliance.

On this Blog, I will show you an easier way to deploy the vR/OVF’s  to the vCenter.

To start off with, you will need a copy of the ovftool’s. you can Download a copy from the my.vmware portal link: https://my.vmware.com/web/vmware/details?productId=614&downloadGroup=OVFTOOL420

I would recommend the version 4.2.0 or above to avoid running into deployment bugs.

Installation: 

on an elevated command prompt, change to Program Files\VMware\VMware OVF Tool\

 cd “\Program Files\VMware\VMware OVF Tool\”

use the below syntax to deploy the vR (replace the once’s in the red font with what is on your environment):

ovftool --acceptAllEulas -ds="DATASTORE_NAME" -n="SPECIFY VRMS NAME" --net:"Management Network"="PORT GROUP NAME" --prop:"password"="VRMS ROOT PASSWORD" --prop:"ntpserver"="NTP SERVER IP OR FQDN" --prop:"vami.ip0.vSphere_Replication_Appliance"="SPECIFY VRMS SERVER IP" --vService:installation=com.vmware.vim.vsm:extension_vservice <PATH>\vSphere_Replication_OVF10.ovf vi://[email protected]:VMWARE123!@VCENTER IP/?ip=HOST IP

Note: VMWARE123! is to be replaced with the password for [email protected] account


Example:

vpxd crashes bora/vpx/vpxd/vpxservices/alarm/PredefinedAlarmsManager.cpp:203

vpxd.log
2019-02-20T02:09:33.982Z info vpxd[07142] [Originator@6876 sub=vpxLro opID=lro-5-5364f5ed] [VpxLRO] -- BEGIN lro-5 --  -- QuerySCLRO --
2019-02-20T02:09:33.982Z info vpxd[07142] [Originator@6876 sub=vpxLro opID=lro-5-5364f5ed] [VpxLRO] -- FINISH lro-5
2019-02-20T02:09:33.982Z info vpxd[07142] [Originator@6876 sub=ThreadPool] Spawning additional worker - allocated: 150, idle: 20
2019-02-20T02:09:33.982Z error vpxd[07142] [Originator@6876 sub=alarmMo opID=CreatePredefinedAlarms-94dc561] Upgrade from pre VC5.0 version not supported in VC 6X
2019-02-20T02:09:33.982Z info vpxd[07447] [Originator@6876 sub=ThreadPool] Thread enlisted
2019-02-20T02:09:33.982Z info vpxd[07447] [Originator@6876 sub=ThreadPool] Entering worker thread loop
2019-02-20T02:09:33.982Z info vpxd[07447] [Originator@6876 sub=ThreadPool] Spawning additional worker - allocated: 151, idle: 20
2019-02-20T02:09:33.985Z info vpxd[07135] [Originator@6876 sub=ThreadPool] Spawning additional worker - allocated: 152, idle: 20
2019-02-20T02:09:33.986Z panic vpxd[07142] [Originator@6876 sub=Default opID=CreatePredefinedAlarms-94dc561]
-->
--> Panic: NOT_REACHED bora/vpx/vpxd/vpxservices/alarm/PredefinedAlarmsManager.cpp:203
-->
--> Backtrace:
--> [backtrace begin] product: VMware VirtualCenter, version: 6.7.0, build: build-9433931, tag: vpxd, cpu: x86_64, os: linux, buildType: release
--> backtrace[00] libvmacore.so[0x002A9C48]: Vmacore::System::Stacktrace::CaptureFullWork(unsigned int)
--> backtrace[01] libvmacore.so[0x001B2F1C]: Vmacore::System::SystemFactory::CreateBacktrace(Vmacore::Ref<Vmacore::System::Backtrace>&)
--> backtrace[02] libvmacore.so[0x002A7E1E]
--> backtrace[03] libvmacore.so[0x002A7EFE]: Vmacore::PanicExit(char const*)
--> backtrace[04] libvmacore.so[0x001935E5]
--> backtrace[05] libvmacore.so[0x00193683]
--> backtrace[06] vpxd[0x0090C95B]
--> backtrace[07] vpxd[0x008B3A5A]
--> backtrace[08] vpxd[0x00517C29]
--> backtrace[09] vpxd[0x00517CCC]
--> backtrace[10] libvmacore.so[0x00230A3D]
--> backtrace[11] libvmacore.so[0x00230D06]
--> backtrace[12] libvmacore.so[0x002AF3E1]
--> backtrace[13] libpthread.so.0[0x000073D4]
--> backtrace[14] libc.so.6[0x000E8BBD]
--> [backtrace end]


Cause: alarms.version mismatch in database.

Resolution:
Connect to vCenter database

root@vc [ / ]psql VCDB postgres
VCDB=# select * from vpx_parameter where name = 'alarms.version';
      name      | value
----------------+-------
 alarms.version | 0
(1 row)
VCDB=# update vpx_parameter set value = '60' where name = 'alarms.version';
UPDATE 1
VCDB=# select * from vpx_parameter where name = 'alarms.version';
      name      | value
----------------+-------
 alarms.version | 60
(1 row)

Unlock /reset vSphere replication appliance root password.

restart the replication appliance to GRUB

at the grub screen, select SLES 11/12xxx Press ‘e’

Scroll down and look for show opts.

append “init=/bin/bash” to the same line

press f10 on the keyboard to boot

remount the root partition as RW

mount -o remount,rw /

To unlock the locked account, use the below command./sbin/pam_tally2 -r -u root

/sbin/pam_tally2 -r -u root

To reset the password, Use the below:

passwd root


Type exit to reboot the appliance

Isolating vSphere Replication traffic

On the Esxi host.

* create new vmkport group on the source and destination esxi host/cluster

Sample networking on the host:

* add a second nic to the vR appliance and reboot the appliance.

* Log into the VAMI page of the vR appliance (default url: https://ip:5480

* go into network>address

* under the eth1 info: set a static IP address there

* now go back to vR>Configuration

* fill in the “ip address for Incoming storage traffic” with the IP address of eth1 and click on “apply network settings”

* validate network and port connectivity (from source Esxi host to the Destination vR appliance)

* Network: vmkping -I vmkx REMOTE_vR_IP   (where x is the vmkernel portgroup on the host used for replication)

* port: nc -z vR_IP 31031

* validate network and port connectivity: (from Destination vR appliance to the Destination Esxi )

* curl -v telnet://Destination_ESXI_IP:902

Sample Networking configuration (for replication traffic, one way replication)

Sample Networking configuration (for replication traffic, one way replication)