formatVersion: 1
inputs: {}
resources:
  Cloud_NSX_Network_1:
    type: Cloud.NSX.Network
    properties:
      networkType: existing
      constraints:
        - tag: net:vlan7
  Cloud_vSphere_Machine_1:
    type: Cloud.vSphere.Machine
    properties:
      imageRef: w22-cloudinit-instaclone/base
      cpuCount: 2
      totalMemoryMB: 3024
      networks:
        - network: ${resource.Cloud_NSX_Network_1.id}
          assignment: static
      cloudConfig: |
        #cloud-config
        users:
          -
            name: labadmin
            primary_group: administrators
            passwd: bAdP@$$
            inactive: false
          -
            name: tseadmin
            primary_group: administrators
            passwd: bAdP@$$
            inactive: false
          -
            name: administrator
            primary_group: administrators
            passwd: bAdP@$$
            inactive: false
          -
        set_hostname: dc01
        runcmd:
         - powershell.exe net user Administrator /passwordreq:yes
         - powershell.exe Install-WindowsFeature -Name AD-Domain-Services -IncludeManagementTools
         - powershell.exe Install-ADDSForest -CreateDnsDelegation:$false -DatabasePath "C:\Windows\NTDS" -DomainMode "WinThreshold" -DomainName "glabs.local" -DomainNetbiosName "GS" -ForestMode "WinThreshold" -InstallDns:$true -LogPath "C:\Windows\NTDS" -NoRebootOnCompletion:$false -SysvolPath "C:\Windows\SYSVOL" -Force:$true -SafeModeAdministratorPassword (ConvertTo-SecureString -AsPlainText "bAdP@$$" -Force)
IP ALLOCATE failed: Action run failed with the following error: (‘Error allocating in network or range: Failed to generate hostname. DNS suffix missing’, {})
Earlier this week, I was trying to integrate my test vRA deployment with Infoblox and all deployments failed with the error:
IP ALLOCATE failed: Action run failed with the following error: ('Error allocating in network or range: Failed to generate hostname. DNS suffix missing', {})When looking at the Extensibility tab > action runs > (filter) change from user runs to all runs and look for a failed action: Infoblox_AllocateIP.
2023-05-04 15:01:07,914] [ERROR] - Error allocating in network or range: Failed to generate hostname. DNS suffix missing

[2023-05-04 15:01:07,914] [ERROR] - Failed to allocate from range network/ZG5zLm5ldHdvcmskMTAuMTA5LjI0LjAvMjEvMA:10.109.24.0/21/default: ('Error allocating in network or range: Failed to generate hostname. DNS suffix missing', {})

[2023-05-04 15:01:07,914] [ERROR] - No more ranges. Raising last error

('Error allocating in network or range: Failed to generate hostname. DNS suffix missing', {})

Finished running action code.

Exiting python process.

Traceback (most recent call last):

  File "/polyglot/function/source.py", line 171, in allocate_in_network_or_range

    host_record = HostRecordAllocation(range_id, resource, allocation, network_view, next_available_ip, context, endpoint)

  File "/polyglot/function/source.py", line 457, in __init__

    super().__init__(range_id, resource, allocation, network_view, next_available_ip, context, endpoint)

  File "/polyglot/function/source.py", line 392, in __init__

    self.hostname = generate_hostname(self.resource, self.range_id, self.allocation, self.context, self.endpoint["id"]) if self.dns_enabled else self.resource["name"]

  File "/polyglot/function/source.py", line 307, in generate_hostname

    raise Exception("Failed to generate hostname. DNS suffix missing")

Exception: Failed to generate hostname. DNS suffix missing


During handling of the above exception, another exception occurred:


Traceback (most recent call last):

  File "main.py", line 146, in <module>

    main()

  File "main.py", line 83, in main

    result = prepare_inputs_and_invoke(inputs)

  File "main.py", line 119, in prepare_inputs_and_invoke

    res = handler(ctx, inputs)

  File "/polyglot/function/source.py", line 29, in handler

    return ipam.allocate_ip()

  File "/polyglot/function/vra_ipam_utils/ipam.py", line 91, in allocate_ip

    result = self.do_allocate_ip(auth_credentials, cert)

  File "/polyglot/function/source.py", line 51, in do_allocate_ip

    raise e

  File "/polyglot/function/source.py", line 42, in do_allocate_ip

    allocation_result.append(allocate(resource, allocation, self.context, self.inputs["endpoint"]))

  File "/polyglot/function/source.py", line 78, in allocate

    raise last_error

  File "/polyglot/function/source.py", line 70, in allocate

    return allocate_in_network(range_id, resource, allocation, context, endpoint)

  File "/polyglot/function/source.py", line 155, in allocate_in_network

    endpoint)

  File "/polyglot/function/source.py", line 210, in allocate_in_network_or_range

    raise Exception(f"Error allocating in network or range: {str(e)}", result)

Exception: ('Error allocating in network or range: Failed to generate hostname. DNS suffix missing', {})

Python process exited.
There are 2 ways to remediate this.
Workaround 1: (if you do not care about adding the domain suffix to the records created on infoblox)
update your blueprint, add “Infoblox.IPAM.Network.enableDns: false” under properties for every type: cloud.vSphere.machine
resources:
  vCenterServer:
    type: Cloud.vSphere.Machine
    properties:
      Infoblox.IPAM.Network.enableDns: false
      name: Test
      imageRef: ${input.img_image_url}
      flavor: ${input.flavor}
The above deployment will ignore DNS suffix and will create a DNS record with the custom naming template as defined in the project (host name alone)
Workaround 2: If you do want the DNS records to be created with hostname + domain, then add the below to the blueprint:
resources:
  vCenterServer:
    type: Cloud.vSphere.Machine
    properties:
      Infoblox.IPAM.Network.dnsSuffix: lab.local
      name: Test
      imageRef: ${input.img_image_url}
      flavor: ${input.flavor}
with the above, the deployment will suffix the domain “lab.local” with the hostname and the respective DNS records will be created.
It took me a long time to figure this out. hopefully, this saves you a lot of time!
Cheers!
Troubleshooting saltconfig (aria config) Minion Deployment Failure
When troubleshooting a minion deployment failure, I would recommend hashing out the salt part of the blueprint and run this as a day2 task. This would help save significant deployment time and help focuss on the minion deployment issue alone.
So in my scenario, I Finished my deployment and run the salt as a day2 task which failed:
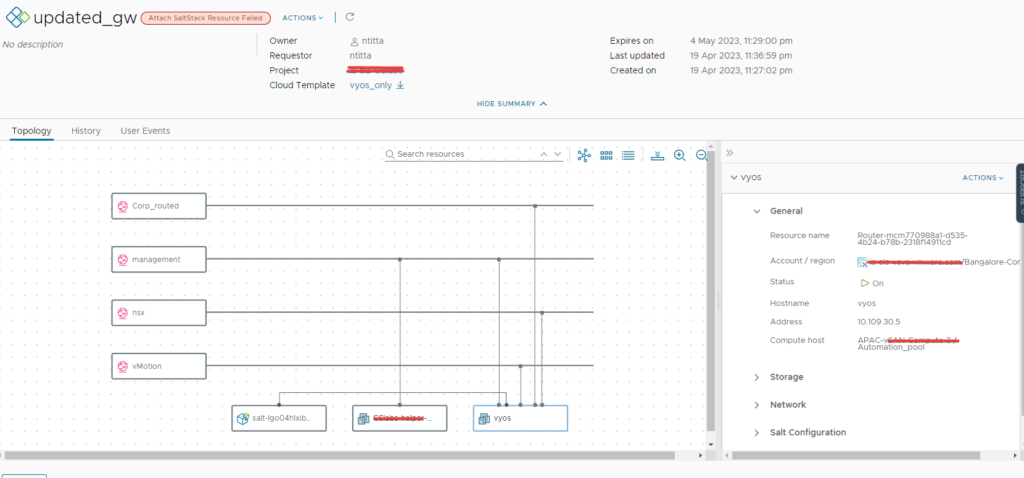

Navigate to Aria config(salt-config) web UI > activity > jobs > completed > Look for a deploy.minion task click on the JID (the long number to the right table of the job) and then click on raw:
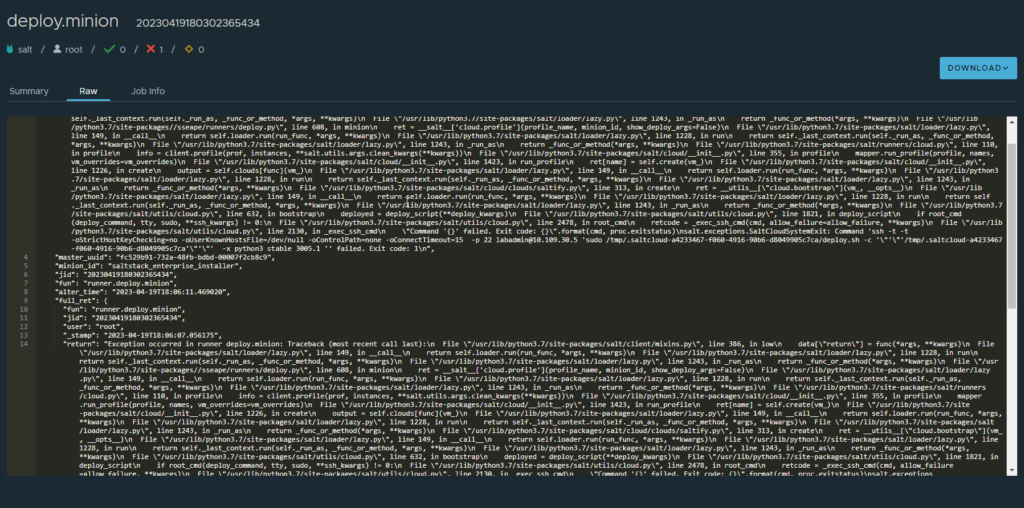
so, this tells us that the script that was being executed failed and hence “Exit code: 1”
SSH to salt master and navigate to /etc/salt/cloud.profiles.d, you should see a conf with the the same vRA deployment name. in my case it was the second one from the below screenshot.

at this stage, you can manually call on salt-cloud with the debug flag so that you have realtime logging as the script attempts to connect to the remote host and bootstrap the minion.
The basic syntax is
salt-cloud -p profile_name VM_name -l debugin my case:
salt-cloud -p ssc_Router-mcm770988a1-d535-4b24-b78b-2318f14911cd_profile test -l debugNote: do not include the .conf in the profile name and the VM_name can be anything, it really does not matter in the current senario.
Typically, you want to look at the very end for the errors, In my case it was bad DNS.
[email protected]'s password: [DEBUG   ] [email protected]'s password:

[sudo] password for labadmin: [DEBUG   ] [sudo] password for labadmin:

 *  INFO: Running version: 2022.08.12
 *  INFO: Executed by: /bin/sh
 *  INFO: Command line: '/tmp/.saltcloud-3e1d4338-c7d1-4dbb-8596-de0d6bf587ec/deploy.sh -c /tmp/.saltcloud-3e1d4338-c7d1-4dbb-8596-de0d6bf587ec -x python3 stable 3005.1'
 *  WARN: Running the unstable version of bootstrap-salt.sh

 *  INFO: System Information:
 *  INFO:   CPU:          AuthenticAMD
 *  INFO:   CPU Arch:     x86_64
 *  INFO:   OS Name:      Linux
 *  INFO:   OS Version:   5.15.0-69-generic
 *  INFO:   Distribution: Ubuntu 22.04

 *  INFO: Installing minion
 *  INFO: Found function install_ubuntu_stable_deps
 *  INFO: Found function config_salt
 *  INFO: Found function preseed_master
 *  INFO: Found function install_ubuntu_stable
 *  INFO: Found function install_ubuntu_stable_post
 *  INFO: Found function install_ubuntu_res[DEBUG   ]  *  INFO: Running version: 2022.08.12
 *  INFO: Executed by: /bin/sh
 *  INFO: Command line: '/tmp/.saltcloud-3e1d4338-c7d1-4dbb-8596-de0d6bf587ec/deploy.sh -c /tmp/.saltcloud-3e1d4338-c7d1-4dbb-8596-de0d6bf587ec -x python3 stable 3005.1'
 *  WARN: Running the unstable version of bootstrap-salt.sh

 *  INFO: System Information:
 *  INFO:   CPU:          AuthenticAMD
 *  INFO:   CPU Arch:     x86_64
 *  INFO:   OS Name:      Linux
 *  INFO:   OS Version:   5.15.0-69-generic
 *  INFO:   Distribution: Ubuntu 22.04

 *  INFO: Installing minion
 *  INFO: Found function install_ubuntu_stable_deps
 *  INFO: Found function config_salt
 *  INFO: Found function preseed_master
 *  INFO: Found function install_ubuntu_stable
 *  INFO: Found function install_ubuntu_stable_post
 *  INFO: Found function install_ubuntu_res
tart_daemons
 *  INFO: Found function daemons_running
 *  INFO: Found function install_ubuntu_check_services
 *  INFO: Running install_ubuntu_stable_deps()
Ign:1 http://in.archive.ubuntu.com/ubuntu jammy InRelease
Ign:2 https://packages.microsoft.com/ubuntu/22.04/prod jammy InRelease
Ign:3 https://repo.saltproject.io/py3/ubuntu/20.04/amd64/archive/3005.1 focal InRelease
Ign:4 http://in.archive.ubuntu.com/ubuntu jammy-updates InRelease
Ign:5 http://in.archive.ubuntu.com/ubuntu jammy-backports InRelease
Ign:6 http://in.archive.ubuntu.com/ubuntu jammy-security InRelease
[DEBUG   ] tart_daemons
 *  INFO: Found function daemons_running
 *  INFO: Found function install_ubuntu_check_services
 *  INFO: Running install_ubuntu_stable_deps()
Ign:1 http://in.archive.ubuntu.com/ubuntu jammy InRelease
Ign:2 https://packages.microsoft.com/ubuntu/22.04/prod jammy InRelease
Ign:3 https://repo.saltproject.io/py3/ubuntu/20.04/amd64/archive/3005.1 focal InRelease
Ign:4 http://in.archive.ubuntu.com/ubuntu jammy-updates InRelease
Ign:5 http://in.archive.ubuntu.com/ubuntu jammy-backports InRelease
Ign:6 http://in.archive.ubuntu.com/ubuntu jammy-security InRelease
[DEBUG   ] Ign:1 http://in.archive.ubuntu.com/ubuntu jammy InRelease
Ign:2 https://packages.microsoft.com/ubuntu/22.04/prod jammy InRelease
Ign:3 https://repo.saltproject.io/py3/ubuntu/20.04/amd64/archive/3005.1 focal InRelease
Ign:4 http://in.archive.ubuntu.com/ubuntu jammy-updates InRelease
Ign:5 http://in.archive.ubuntu.com/ubuntu jammy-backports InRelease
Ign:6 http://in.archive.ubuntu.com/ubuntu jammy-security InRelease
Err:1 http://in.archive.ubuntu.com/ubuntu jammy InRelease
  Temporary failure resolving 'in.archive.ubuntu.com'
Err:3 https://repo.saltproject.io/py3/ubuntu/20.04/amd64/archive/3005.1 focal InRelease
  Temporary failure resolving 'repo.saltproject.io'
Err:2 https://packages.microsoft.com/ubuntu/22.04/prod jammy InRelease
  Temporary failure resolving 'packages.microsoft.com'
Err:4 http://in.archive.ubuntu.com/ubuntu jammy-updates InRelease
  Temporary failure resolving 'in.archive.ubuntu.com'
Err:5 http://in.archive.ubuntu.com/ubuntu jammy-backports InRelease
  Temporary failure resolving 'in.archive.ubuntu.com'
Err:6 http://in.archive.ubuntu.com/ubuntu jammy-security InRelease
  Temporary failure resolving 'in.archive.ubuntu.com'
Reading package lists...[DEBUG   ] Err:1 http://in.archive.ubuntu.com/ubuntu jammy InRelease
  Temporary failure resolving 'in.archive.ubuntu.com'
Err:3 https://repo.saltproject.io/py3/ubuntu/20.04/amd64/archive/3005.1 focal InRelease
  Temporary failure resolving 'repo.saltproject.io'
Err:2 https://packages.microsoft.com/ubuntu/22.04/prod jammy InRelease
  Temporary failure resolving 'packages.microsoft.com'
Err:4 http://in.archive.ubuntu.com/ubuntu jammy-updates InRelease
  Temporary failure resolving 'in.archive.ubuntu.com'
Err:5 http://in.archive.ubuntu.com/ubuntu jammy-backports InRelease
  Temporary failure resolving 'in.archive.ubuntu.com'
Err:6 http://in.archive.ubuntu.com/ubuntu jammy-security InRelease
  Temporary failure resolving 'in.archive.ubuntu.com'
Reading package lists...
Connection to 10.109.30.5 closed.
[DEBUG   ] Connection to 10.109.30.5 closed.

 *  WARN: Non-LTS Ubuntu detected, but stable packages requested. Trying packages for previous LTS release. You may experience problems.
Reading package lists...
Building dependency tree...
Reading state information...
wget is already the newest version (1.21.2-2ubuntu1).
ca-certificates is already the newest version (20211016ubuntu0.22.04.1).
gnupg is already the newest version (2.2.27-3ubuntu2.1).
apt-transport-https is already the newest version (2.4.8).
The following packages were automatically installed and are no longer required:
  eatmydata libeatmydata1 python3-json-pointer python3-jsonpatch
Use 'sudo apt autoremove' to remove them.
0 upgraded, 0 newly installed, 0 to remove and 62 not upgraded.
 * ERROR: https://repo.saltproject.io/py3/ubuntu/20.04/amd64/archive/3005.1/salt-archive-keyring.gpg failed to download to /tmp/salt-gpg-UclYVAky.pub
 * ERROR: Failed to run install_ubuntu_stable_deps()!!!
[DEBUG   ]  *  WARN: Non-LTS Ubuntu detected, but stable packages requested. Trying packages for previous LTS release. You may experience problems.
Reading package lists...
Building dependency tree...
Reading state information...
wget is already the newest version (1.21.2-2ubuntu1).
ca-certificates is already the newest version (20211016ubuntu0.22.04.1).
gnupg is already the newest version (2.2.27-3ubuntu2.1).
apt-transport-https is already the newest version (2.4.8).
The following packages were automatically installed and are no longer required:
  eatmydata libeatmydata1 python3-json-pointer python3-jsonpatch
Use 'sudo apt autoremove' to remove them.
0 upgraded, 0 newly installed, 0 to remove and 62 not upgraded.
 * ERROR: https://repo.saltproject.io/py3/ubuntu/20.04/amd64/archive/3005.1/salt-archive-keyring.gpg failed to download to /tmp/salt-gpg-UclYVAky.pub
 * ERROR: Failed to run install_ubuntu_stable_deps()!!!
The same can be done for windows minion deployment troubleshooting too!!
vra8: Windows Deployment fails with “A specified parameter was not correct: spec.identification.domainAdmin” after upgrading to vCenter 7.0u3a/6.7p06/6.5P07
Windows-based deployment fails with error: “A specified parameter was not correct: spec.identification.domainAdmin”
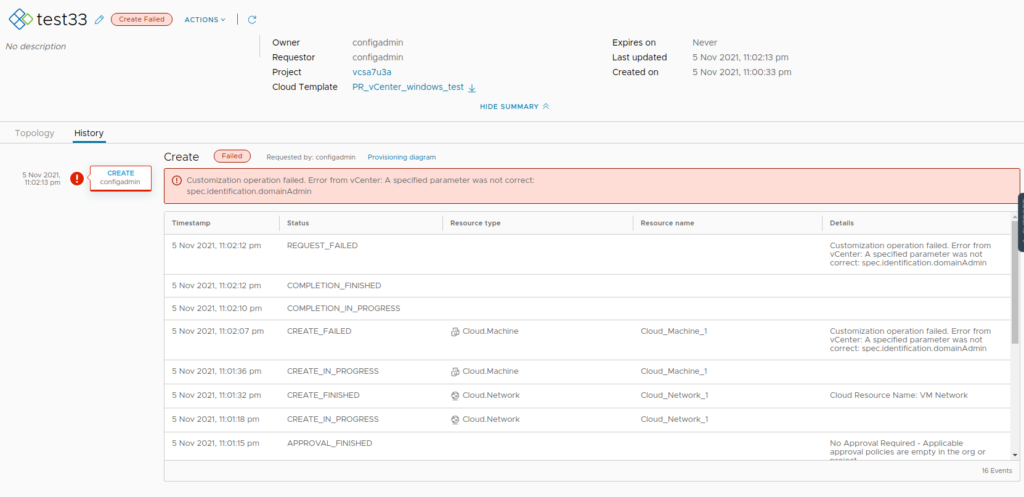
Logs: vpxd.log on the vCenter
 info vpxd[10775] [Originator@6876 sub=Default opID=68b9a06d] [VpxLRO] -- ERROR task-121185 -- vm-2123 -- vim.VirtualMachine.customize: vmodl.fault.InvalidArgument:
--> Result:
--> (vmodl.fault.InvalidArgument) {
-->    faultCause = (vmodl.MethodFault) null,
-->    faultMessage = <unset>,
-->    invalidProperty = "spec.identification.domainAdmin"
-->    msg = ""
--> }
...
...
...
-->       identification = (vim.vm.customization.Identification) {
-->          joinWorkgroup = <unset>,
-->          joinDomain = "ntitta.lab",
-->          domainAdmin = "",
-->          domainAdminPassword = (vim.vm.customization.Password) {
-->             value = (not shown),
-->             plainText = true
Cause: There were changes made to guest cust spec on 7.0u3a
Workaround:
For a blueprint that does not leverage domain join, Navigate to Cloud assembly > Network Profile> open (the-network-profile-used-in-bp) > networks > edit(vCenter_network_mapped)
leave the domain filed here as blank and then re-run the deployment.
re-run the deployment, it now works:
SaltConfig and Identity manager integration
SaltConfig must be running version 8.5 and must be deployed via LCM.
If vRA is running on self-signed/local-CA/LCM-CA certificates the saltstack UI will not load and you will see similar symptoms:
Specifically, a blank page when logging on to salt UI with account/info api returning 500
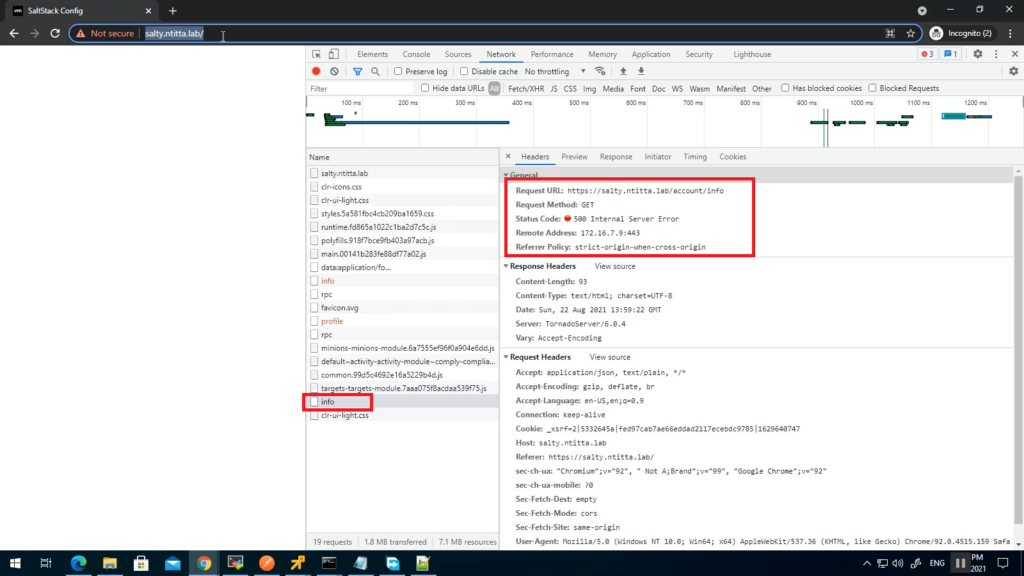
Logs:
less /var/log/raas/raas
Traceback (most recent call last):
File "requests/adapters.py", line 449, in send
File "urllib3/connectionpool.py", line 756, in urlopen
File "urllib3/util/retry.py", line 574, in increment
urllib3.exceptions.MaxRetryError: HTTPSConnectionPool(host='automation.ntitta.lab', port=443): Max retries exceeded with url: /csp/gateway/am/api/auth/discovery?username=service_type&state=aHR0cHM6Ly9zYWx0eS5udGl0dGEubGFiL2lkZW50aXR5L2FwaS9jb3JlL2F1dGhuL2NzcA%3D%3D&redirect_uri=https%3A%2F%2Fsalty.ntitta.lab%2Fidentity%2Fapi%2Fcore%2Fauthn%2Fcsp&client_id=ssc-HLwywt0h3Y (Caused by SSLError(SSLCertVerificationError(1, '[SSL: CERTIFICATE_VERIFY_FAILED] certificate verify failed: self signed certificate in certificate chain (_ssl.c:1076)')))

During handling of the above exception, another exception occurred:

Traceback (most recent call last):
File "tornado/web.py", line 1680, in _execute
File "raas/utils/rest.py", line 153, in prepare
File "raas/utils/rest.py", line 481, in prepare
File "pop/contract.py", line 170, in __call__
File "/var/lib/raas/unpack/_MEIb1NPIC/raas/mods/vra/params.py", line 250, in get_login_url
verify=validate_ssl)
File "requests/api.py", line 76, in get
File "requests/api.py", line 61, in request
File "requests/sessions.py", line 542, in request
File "raven/breadcrumbs.py", line 341, in send
File "requests/sessions.py", line 655, in send
File "requests/adapters.py", line 514, in send
requests.exceptions.SSLError: HTTPSConnectionPool(host='automation.ntitta.lab', port=443): Max retries exceeded with url: /csp/gateway/am/api/auth/discovery?username=service_type&state=aHR0cHM6Ly9zYWx0eS5udGl0dGEubGFiL2lkZW50aXR5L2FwaS9jb3JlL2F1dGhuL2NzcA%3D%3D&redirect_uri=https%3A%2F%2Fsalty.ntitta.lab%2Fidentity%2Fapi%2Fcore%2Fauthn%2Fcsp&client_id=ssc-HLwywt0h3Y (Caused by SSLError(SSLCertVerificationError(1, '[SSL: CERTIFICATE_VERIFY_FAILED] certificate verify failed: self signed certificate in certificate chain (_ssl.c:1076)')))
2021-08-23 04:29:16,906 [tornado.access                                                    ][ERROR   :2250][Webserver:59844] 500 POST /rpc (127.0.0.1) 1697.46ms
To resolve this, grab the root certificate of vRA and import this over to the saltstack appliance root store:
Grab root certificate:
Cli method:
root@salty [ ~ ]# openssl s_client -showcerts -connect automation.ntitta.lab:443
CONNECTED(00000003)
depth=1 CN = vRealize Suite Lifecycle Manager Locker CA, O = VMware, C = IN
verify error:num=19:self signed certificate in certificate chain
---
Certificate chain
 0 s:/CN=automation.ntitta.lab/OU=labs/O=GSS/L=BLR/ST=KA/C=IN
   i:/CN=vRealize Suite Lifecycle Manager Locker CA/O=VMware/C=IN
-----BEGIN CERTIFICATE-----
MIID7jCCAtagAwIBAgIGAXmkBtDxMA0GCSqGSIb3DQEBCwUAMFMxMzAxBgNVBAMM
KnZSZWFsaXplIFN1aXRlIExpZmVjeWNsZSBNYW5hZ2VyIExvY2tlciBDQTEPMA0G
A1UECgwGVk13YXJlMQswCQYDVQQGEwJJTjAeFw0yMTA1MjUxNDU2MjBaFw0yMzA1
MjUxNDU2MjBaMGUxHjAcBgNVBAMMFWF1dG9tYXRpb24ubnRpdHRhLmxhYjENMAsG
A1UECwwEbGFiczEMMAoGA1UECgwDR1NTMQwwCgYDVQQHDANCTFIxCzAJBgNVBAgM
AktBMQswCQYDVQQGEwJJTjCCASIwDQYJKoZIhvcNAQEBBQADggEPADCCAQoCggEB
AJ+p/UsPFJp3WESJfUNlPWAUtYOUQ9cK5lZXBrEK79dtOwzJ8noUyKndO8i5wumC
tNJP8U3RjKbqu75UZH3LiwoHTOEkqhWufrn8gL7tQjtiQ0iAp2pP6ikxH2bXNAwF
Dh9/2CMjLhSN5mb7V5ehu4rP3/Niu19nT5iA1XMER3qR2tsRweV++78vrYFsKDS9
ePa+eGvMNrVaXvbYN75KnLEKbpkHGPg9P10zLbP/lPIskEGfgBMjS7JKOPxZZKX1
GczW/2sFq9OOr4bW6teWG3gt319N+ReNlUxnrxMDkKcWrml8EbeQMp4RmmtXX5Z4
JeVEATMS7O2CeoEN5E/rFFUCAwEAAaOBtTCBsjAdBgNVHQ4EFgQUz/pxN1bN/GxO
cQ/hcQCgBSdRqaUwHwYDVR0jBBgwFoAUYOI4DbX97wdcZa/pWivAMvnnDekwMAYD
VR0RBCkwJ4IXKi5hdXRvbWF0aW9uLm50aXR0YS5sYWKCDCoubnRpdHRhLmxhYjAO
BgNVHQ8BAf8EBAMCBaAwIAYDVR0lAQH/BBYwFAYIKwYBBQUHAwIGCCsGAQUFBwMB
MAwGA1UdEwEB/wQCMAAwDQYJKoZIhvcNAQELBQADggEBAA2KntXAyrY6DHho8FQc
R2GrHVCCWG3ugyPEq7S7tAabMIeSVhbPWsDaVLro5PlldK9FAUhinbxEwShIJfVP
+X1WOBUxwTQ7anfiagonMNotGtow/7f+fnHGO4Mfyk+ICo+jOp5DTDHGRmF8aYsP
5YGkOdpAb8SuT/pNerZie5WKx/3ZuUwsEDTqF3CYdqWQZSuDIlWRetECZAaq50hJ
c6kD/D1+cq2pmN/DI/U9RAfsvexkhdZaMbHdrlGzNb4biSvJ8HjJMH4uNLUN+Nyf
2MON41QKRRuzQn+ahq7X/K2BbxJTQUZGwbC+0CA6M79dQ1eVQui4d5GXmjutqFIo
Xwo=
-----END CERTIFICATE-----
 1 s:/CN=vRealize Suite Lifecycle Manager Locker CA/O=VMware/C=IN
   i:/CN=vRealize Suite Lifecycle Manager Locker CA/O=VMware/C=IN
-----BEGIN CERTIFICATE-----
MIIDiTCCAnGgAwIBAgIGAXmEbtiqMA0GCSqGSIb3DQEBCwUAMFMxMzAxBgNVBAMM
KnZSZWFsaXplIFN1aXRlIExpZmVjeWNsZSBNYW5hZ2VyIExvY2tlciBDQTEPMA0G
A1UECgwGVk13YXJlMQswCQYDVQQGEwJJTjAeFw0yMTA1MTkxMTQyMDdaFw0zMTA1
MTcxMTQyMDdaMFMxMzAxBgNVBAMMKnZSZWFsaXplIFN1aXRlIExpZmVjeWNsZSBN
YW5hZ2VyIExvY2tlciBDQTEPMA0GA1UECgwGVk13YXJlMQswCQYDVQQGEwJJTjCC
ASIwDQYJKoZIhvcNAQEBBQADggEPADCCAQoCggEBAK6S4ESddCC7BAl4MACpAeAm
1JBaw72NgeSOruS/ljpd1MyDd/AJjpIpdie2M0cweyGDaJ4+/C549lxQe0NAFsgh
62BG87klbhzvYja6aNKvE+b1EKNMPllFoWiCKJIxZOvTS2FnXjXZFZKMw5e+hf2R
JgPEww+KsHBqcWL3YODmD6NvBRCpY2rVrxUjqh00ouo7EC6EHzZoJSMoSwcEgIGz
pclYSPuEzdbNFKVtEQGrdt94xlAk04mrqP2O6E7Fd5EwrOw/+dsFt70qS0aEj9bQ
nk7GeRXhJynXxlEpgChCDEXQ3MWvLIRwOuMBxQq/W4B/ZzvQVzFwmh3S8UkPTosC
AwEAAaNjMGEwHQYDVR0OBBYEFGDiOA21/e8HXGWv6VorwDL55w3pMB8GA1UdIwQY
MBaAFGDiOA21/e8HXGWv6VorwDL55w3pMA8GA1UdEwEB/wQFMAMBAf8wDgYDVR0P
AQH/BAQDAgGGMA0GCSqGSIb3DQEBCwUAA4IBAQBqAjCBd+EL6koGogxd72Dickdm
ecK60ghLTNJ2wEKvDICqss/FopeuEVhc8q/vyjJuirbVwJ1iqKuyvANm1niym85i
fjyP6XaJ0brikMPyx+TSNma/WiDoMXdDviUuYZo4tBJC2DUPJ/0KDI7ysAsMTB0R
8Q7Lc3GlJS65AFRNIxkpHI7tBPp2W8tZQlVBe7PEcWMzWRjWZAvwDGfnNvUtX4iY
bHEVWSzpoVQUk1hcylecYeMSCzBGw/efuWayIFoSf7ZXFe0TAEOJySwkzGJB9n78
4Rq0ydikMT4EFHP5G/iFI2zsx2vZGNsAHCw7XSVFydqb/ekm/9T7waqt3fW4
-----END CERTIFICATE-----
---
Server certificate
subject=/CN=automation.ntitta.lab/OU=labs/O=GSS/L=BLR/ST=KA/C=IN
issuer=/CN=vRealize Suite Lifecycle Manager Locker CA/O=VMware/C=IN
---
No client certificate CA names sent
Peer signing digest: SHA512
Server Temp Key: ECDH, P-256, 256 bits
---
SSL handshake has read 2528 bytes and written 393 bytes
---
New, TLSv1/SSLv3, Cipher is ECDHE-RSA-AES256-GCM-SHA384
Server public key is 2048 bit
Secure Renegotiation IS supported
Compression: NONE
Expansion: NONE
No ALPN negotiated
SSL-Session:
    Protocol  : TLSv1.2
    Cipher    : ECDHE-RSA-AES256-GCM-SHA384
    Session-ID: B06BE4668E5CCE713F1C1547F0917CC901F143CB13D06ED7A111784AAD10B2F6
    Session-ID-ctx:
    Master-Key: 75E8109DD84E2DD064088B44779C4E7FEDA8BE91693C5FC2A51D3F90B177F5C92B7AB638148ADF612EBEFDA30930DED4
    Key-Arg   : None
    PSK identity: None
    PSK identity hint: None
    SRP username: None
    TLS session ticket:
    0000 - b9 54 91 b7 60 d4 18 d2-4b 72 55 db 78 e4 91 10   .T..`...KrU.x...
    0010 - 1f 97 a0 35 31 16 21 db-8c 49 bf 4a a1 b4 59 ff   ...51.!..I.J..Y.
    0020 - 07 22 1b cc 20 d5 52 7a-52 84 17 86 b3 2a 7a ee   .".. .RzR....*z.
    0030 - 14 c3 9b 9f 8f 24 a7 a1-76 4d a2 4f bb d7 5a 21   .....$..vM.O..Z!
    0040 - c9 a6 d0 be 3b 57 4a 4e-cd cc 9f a6 12 45 09 b5   ....;WJN.....E..
    0050 - ca c4 c9 57 f5 ac 17 04-94 cb d0 0a 77 17 ac b8   ...W........w...
    0060 - 8a b2 39 f1 78 70 37 6d-d0 bf f1 73 14 63 e8 86   ..9.xp7m...s.c..
    0070 - 17 27 80 c1 3e fe 54 cf-                          .'..>.T.

    Start Time: 1629788388
    Timeout   : 300 (sec)
    Verify return code: 19 (self signed certificate in certificate chain)
From the above example,
Certificate chain 0 s:/CN=automation.ntitta.lab/OU=labs/O=GSS/L=BLR/ST=KA/C=IN <—-this is my vRA cert
i:/CN=vRealize Suite Lifecycle Manager Locker CA/O=VMware/C=IN <—-This is the root cert (Generated via LCM)
Create a new cert file with the contents of the root certificate.
cat root.crt
-----BEGIN CERTIFICATE-----
MIIDiTCCAnGgAwIBAgIGAXmEbtiqMA0GCSqGSIb3DQEBCwUAMFMxMzAxBgNVBAMM
KnZSZWFsaXplIFN1aXRlIExpZmVjeWNsZSBNYW5hZ2VyIExvY2tlciBDQTEPMA0G
A1UECgwGVk13YXJlMQswCQYDVQQGEwJJTjAeFw0yMTA1MTkxMTQyMDdaFw0zMTA1
MTcxMTQyMDdaMFMxMzAxBgNVBAMMKnZSZWFsaXplIFN1aXRlIExpZmVjeWNsZSBN
YW5hZ2VyIExvY2tlciBDQTEPMA0GA1UECgwGVk13YXJlMQswCQYDVQQGEwJJTjCC
ASIwDQYJKoZIhvcNAQEBBQADggEPADCCAQoCggEBAK6S4ESddCC7BAl4MACpAeAm
1JBaw72NgeSOruS/ljpd1MyDd/AJjpIpdie2M0cweyGDaJ4+/C549lxQe0NAFsgh
62BG87klbhzvYja6aNKvE+b1EKNMPllFoWiCKJIxZOvTS2FnXjXZFZKMw5e+hf2R
JgPEww+KsHBqcWL3YODmD6NvBRCpY2rVrxUjqh00ouo7EC6EHzZoJSMoSwcEgIGz
pclYSPuEzdbNFKVtEQGrdt94xlAk04mrqP2O6E7Fd5EwrOw/+dsFt70qS0aEj9bQ
nk7GeRXhJynXxlEpgChCDEXQ3MWvLIRwOuMBxQq/W4B/ZzvQVzFwmh3S8UkPTosC
AwEAAaNjMGEwHQYDVR0OBBYEFGDiOA21/e8HXGWv6VorwDL55w3pMB8GA1UdIwQY
MBaAFGDiOA21/e8HXGWv6VorwDL55w3pMA8GA1UdEwEB/wQFMAMBAf8wDgYDVR0P
AQH/BAQDAgGGMA0GCSqGSIb3DQEBCwUAA4IBAQBqAjCBd+EL6koGogxd72Dickdm
ecK60ghLTNJ2wEKvDICqss/FopeuEVhc8q/vyjJuirbVwJ1iqKuyvANm1niym85i
fjyP6XaJ0brikMPyx+TSNma/WiDoMXdDviUuYZo4tBJC2DUPJ/0KDI7ysAsMTB0R
8Q7Lc3GlJS65AFRNIxkpHI7tBPp2W8tZQlVBe7PEcWMzWRjWZAvwDGfnNvUtX4iY
bHEVWSzpoVQUk1hcylecYeMSCzBGw/efuWayIFoSf7ZXFe0TAEOJySwkzGJB9n78
4Rq0ydikMT4EFHP5G/iFI2zsx2vZGNsAHCw7XSVFydqb/ekm/9T7waqt3fW4
-----END CERTIFICATE-----
Backup existing certificate store:
cp /etc/pki/tls/certs/ca-bundle.crt ~/Copy the lcm certificate to the certificate store:
cat root.crt >> /etc/pki/tls/certs/ca-bundle.crtadd the below to raas.service, /usr/lib/systemd/system/raas.service
Environment=REQUESTS_CA_BUNDLE=/etc/pki/tls/certs/ca-bundle.crtExample:
root@salty [ ~ ]# cat /usr/lib/systemd/system/raas.service
[Unit]
Description=The SaltStack Enterprise API Server
After=network.target

[Service]
Type=simple
User=raas
Group=raas
# to be able to bind port < 1024
AmbientCapabilities=CAP_NET_BIND_SERVICE
NoNewPrivileges=yes
RestrictAddressFamilies=AF_INET AF_INET6 AF_UNIX AF_NETLINK
PermissionsStartOnly=true
ExecStartPre=/bin/sh -c 'systemctl set-environment FIPS_MODE=$(/opt/vmware/bin/ovfenv -q --key fips-mode)'
ExecStartPre=/bin/sh -c 'systemctl set-environment NODE_TYPE=$(/opt/vmware/bin/ovfenv -q --key node-type)'
Environment=REQUESTS_CA_BUNDLE=/etc/pki/tls/certs/ca-bundle.crt
ExecStart=/usr/bin/raas
TimeoutStopSec=90

[Install]
WantedBy=multi-user.target
Restart salt service:
systemctl daemon-reload
systemctl restart raas && tail -f /var/log/raas/raas
Upon restart, the above command should start to tail the raas logs, ensure that we no longer see the certificate-related messages.
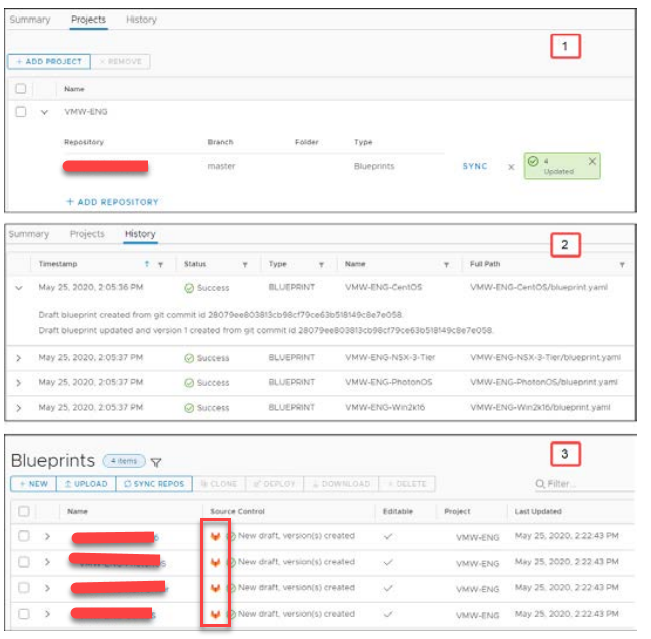
vRA 8.x GitLab Integration
Create the GitLab integration in vRealize Automation:
1. Navigate to Infrastructure > Connections > Integrations.
2. Click + ADD INTEGRATION.
3. Select GitLab.
4. Enter the Name and Description.
5. Enter the server URL.
6. Enter the access token.
7. Click VALIDATE.
8. Click ADD.
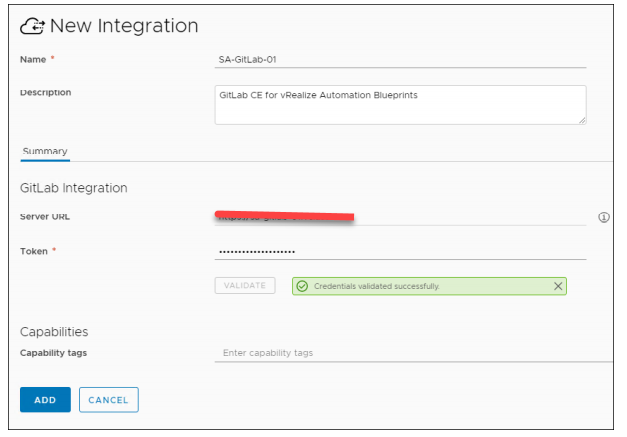
The Access Token is copied from the GitLab console.
Preparing the GitLab Repository
You must create and save your blueprints in a specific structure in the GitLab repository so that vRealize Automation can detect them. The following prerequisites must be met:
• Create separate directories in the repository for each blueprint.
• Each directory must have one blueprint with the blueprint.yaml name.
• The blueprint must include the following properties at the top of the YAML code:
— name:
— version:
Creating Dedicated Directories
In the GitLab console, navigate to Repository and click New directory. Specify the directory name and description.
To have 10 blueprints source controlled in a vRealize Automation project, you must create 10 separate directories.

Naming the Blueprints
You must meet the following requirements:
• Blueprint Name:
— Blueprint name must be blueprint.yaml.
— Name is case-sensitive.
— Only one blueprint exists in a directory.
• Blueprint Properties:
— First property must be name:.
— Second property must be version:.
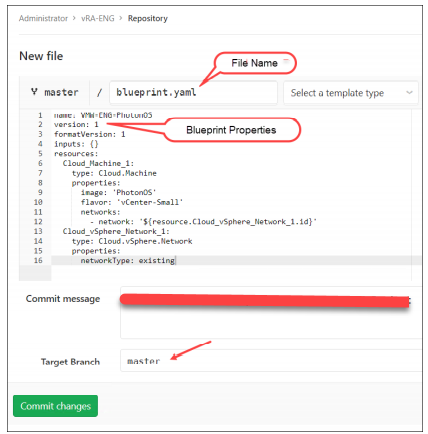
If you fail to meet these requirements of blueprint name and properties in the GitLab repository, the blueprints are not detected in vRealize Automation.
Each repository creates a default branch called master. You can create additional branches. The branch name is used when you add a content source in vRealize Automation.
Creating the GitLab Content Source
Add a content source to the GitLab connection to import blueprints from the specified repository.
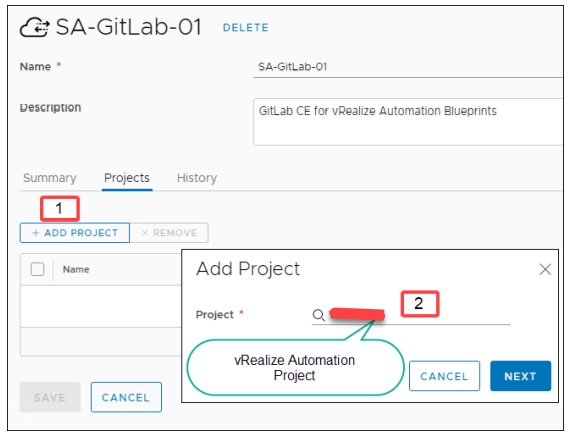
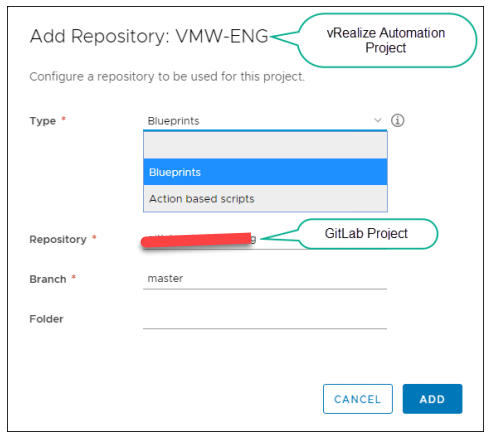
To add a content source to the GitLab integration
1. Select Infrastructure > Integrations and select the GitLab integration.
2. Select Projects.
3. Select an existing vRealize Automation project.
4. Select if you want to import Blueprints or ABX action scripts.
5. Enter the Repository path in GitLab. The path is the user name of the main GitLab account appended to the GitLab project or repository name.
6. Enter the GitLab branch to use.
7. (Optional) Enter a folder (directory) name. If the folder name is blank, all GitLab directories are available. When you click ADD, an automated synchronization task is initiated that imports blueprints into vRealize Automation. When the synchronization tasks are complete, a message indicates that the blueprints are imported.
vRealize Automation and GitLab Projects
The mapping between projects in GitLab and projects in vRealize Automation is one-to-one:
• For example, if you want to source control your blueprints for three projects in vRealize Automation, you must create three projects in GitLab.
• All the blueprints in vRealize Automation are tied with a vRealize Automation project.
• Selecting a vRealize Automation project is mandatory to create a GitLab content source.
• Selecting an existing vRealize Automation project (content source) with a new GitLab project results in a failure
Verifying the Blueprint Synchronization
You can verify the following blueprint synchronization:
• GitLab Integration: Project synchronization status
• GitLab Integration: Project synchronization history
• Cloud Assembly Design Tab: Imported blueprints
vRo 7/8 Plugin on vCenter 6.7 missing/do not load after upgrade
There is no GA plugin available for the HTML5 client. This is planed to be included on the 8.2 release.
You may use the beta client as a workaround, However this needs manual installation.. Please ensure that you take a snapshot before you run through the below steps.
cleanup: Delete/move the contents of the below directory. If the directory do not exist, create them.
ui client:
  /etc/vmware/vsphere-ui/vc-packages/vsphere-client-serenity/com.vmware.vco-7.3.1
 Flex client:
  /etc/vmware/vsphere-client/vc-packages/vsphere-client-serenity/com.vmware.vco-7.3.1/
H5 plugin:
Download the zip file from
https://my.vmware.com/group/vmware/downloads/get-download?downloadGroup=VCOIN-BETAextract the contents of the file to the below path
/etc/vmware/vsphere-ui/vc-packages/vsphere-client-serenity/com.vmware.vco-7.3.1set appropriate permissions to the directory
chown -R vsphere-ui:users /etc/vmware/vsphere-ui/vc-packages/vsphere-client-serenity/com.vmware.vco-7.3.1restart vsphere-ui client:
service-control --restart vsphere-ui
vsphere-flex-client
Download file:
https://communities.vmware.com/servlet/JiveServlet/download/35002-8-243022/vco-plugin-7.4.0.16380053.zipextract the contents of the zip to
/etc/vmware/vsphere-client/vc-packages/vsphere-client-serenity/com.vmware.vco-7.3.1/set appropriate permissions
chown -R vsphere-client:users /etc/vmware/vsphere-client/vc-packages/vsphere-client-serenity/com.vmware.vco-7.3.1Note: for VRO 8.2, The path should be com.vmware.vco-7.4.0
restart vsphere-webclient service:
service-control --restart vsphere-clientlog back in and double check , The plugin will take about 3-5 min to pull data from vRo on loading it.