Create the GitLab integration in vRealize Automation:
1. Navigate to Infrastructure > Connections > Integrations.
2. Click + ADD INTEGRATION.
3. Select GitLab.
4. Enter the Name and Description.
5. Enter the server URL.
6. Enter the access token.
7. Click VALIDATE.
8. Click ADD.
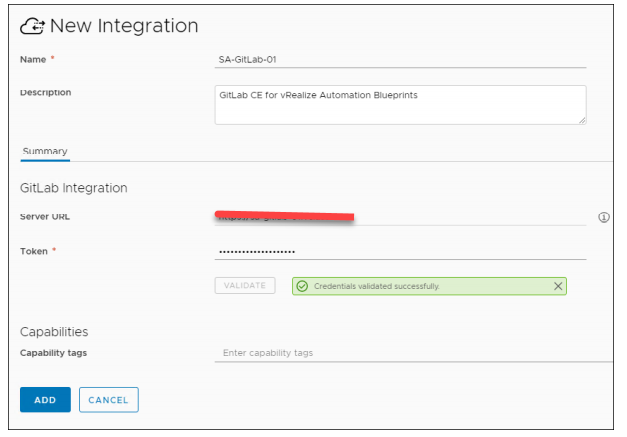
The Access Token is copied from the GitLab console.
Preparing the GitLab Repository
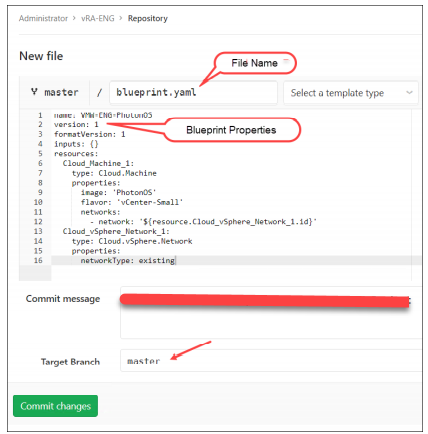
You must create and save your blueprints in a specific structure in the GitLab repository so that vRealize Automation can detect them. The following prerequisites must be met:
• Create separate directories in the repository for each blueprint.
• Each directory must have one blueprint with the blueprint.yaml name.
• The blueprint must include the following properties at the top of the YAML code:
— name:
— version:
Creating Dedicated Directories
In the GitLab console, navigate to Repository and click New directory. Specify the directory name and description.
To have 10 blueprints source controlled in a vRealize Automation project, you must create 10 separate directories.

Naming the Blueprints
You must meet the following requirements:
• Blueprint Name:
— Blueprint name must be blueprint.yaml.
— Name is case-sensitive.
— Only one blueprint exists in a directory.
• Blueprint Properties:
— First property must be name:.
— Second property must be version:.
If you fail to meet these requirements of blueprint name and properties in the GitLab repository, the blueprints are not detected in vRealize Automation.
Each repository creates a default branch called master. You can create additional branches. The branch name is used when you add a content source in vRealize Automation.
Creating the GitLab Content Source
Add a content source to the GitLab connection to import blueprints from the specified repository.
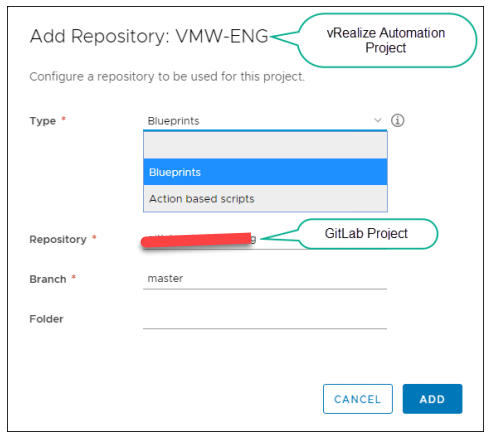
To add a content source to the GitLab integration
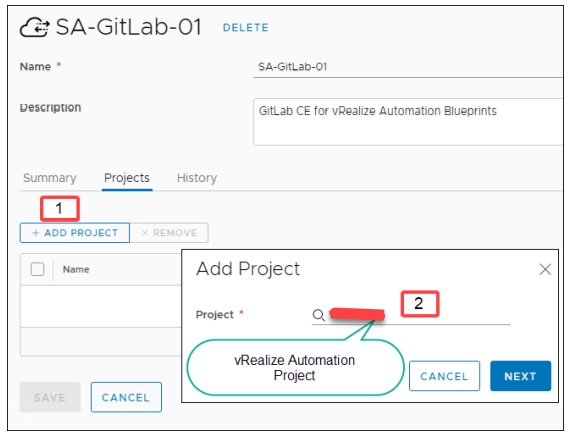
1. Select Infrastructure > Integrations and select the GitLab integration.
2. Select Projects.
3. Select an existing vRealize Automation project.
4. Select if you want to import Blueprints or ABX action scripts.
5. Enter the Repository path in GitLab. The path is the user name of the main GitLab account appended to the GitLab project or repository name.
6. Enter the GitLab branch to use.
7. (Optional) Enter a folder (directory) name. If the folder name is blank, all GitLab directories are available. When you click ADD, an automated synchronization task is initiated that imports blueprints into vRealize Automation. When the synchronization tasks are complete, a message indicates that the blueprints are imported.
vRealize Automation and GitLab Projects
The mapping between projects in GitLab and projects in vRealize Automation is one-to-one:
• For example, if you want to source control your blueprints for three projects in vRealize Automation, you must create three projects in GitLab.
• All the blueprints in vRealize Automation are tied with a vRealize Automation project.
• Selecting a vRealize Automation project is mandatory to create a GitLab content source.
• Selecting an existing vRealize Automation project (content source) with a new GitLab project results in a failure
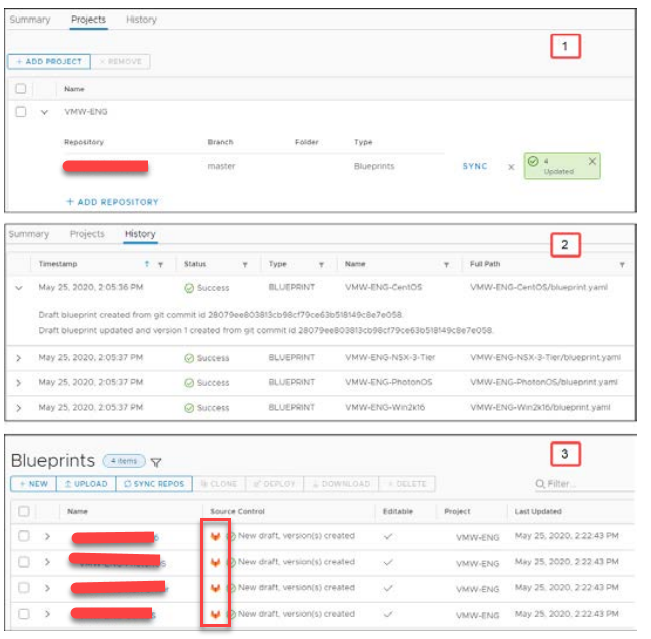
Verifying the Blueprint Synchronization
You can verify the following blueprint synchronization:
• GitLab Integration: Project synchronization status
• GitLab Integration: Project synchronization history
• Cloud Assembly Design Tab: Imported blueprints