reuse a previously used password on photon/VMware appliances?


If for some reason the password had to be reset to the original, the below config file can be changed to allow re-using passwords


edit /etc/pam.d/system-password

vi /etc/pam.d/system-password

change remember=5 to remember=1 and reboot the appliance

Once the appliance boots up, set the password using

passwd root

EDIT: The above does not work with the newer versions of VIDM!

adding a webhook to vRA-Code Stream fails

adding a webhook to vRA-Code Stream fails with error:

java.lang.IllegalArgumentException: 400 BAD_REQUEST "Unable to create webhook at Git server. Request failed with : 422"

browser console:

{timestamp: 1622639483332, path: "/codestream/api/git-webhooks", status: 400, error: "Bad Request",…}
@type: "com.vmware.codestream.exception.CodestreamException"
error: "Bad Request"
message: "400 BAD_REQUEST \"Unable to create webhook at Git server. Request failed with : 422\""
path: "/codestream/api/git-webhooks"
requestId: "929b7098-102300"
status: 400
timestamp: 1622639483332

Symptoms: Gitlab is installed on the same network as of vRA/Codestream


Cause: Gitlab does not allow connections to create a webhook from local subnet by default.

Resolution :Allow requests to the local network from web hooks and services

Steps:

  • On gitlab, go to admin area:
  • On the left hand, navigate to settings> Network
  • enable Allow requests to the local network from system hooks, also add the codestream FQDN (or *) in the URL

Now Go back to codestream and add the webhook: success!!

vcsa update “stage only” and “stage and install grayed out”

screenshot:

Solution: remove/rename the software update status config file

mv /etc/applmgmt/appliance/software_update_state.conf /etc/applmgmt/appliance/software_update_state.conf.bak

On a side note: I ran into the issue after attempting to “stage and install” my homelabs vcsa,
logs reveal:

/var/log/vmware/applmgmt/applmgmt.log
2021-05-30T15:20:26.108 [3758]DEBUG:vmware.appliance.update.update_functions:Removing the mount point /mnt/iso-contents
2021-05-30T15:20:26.109 [3758]INFO:vmware.appliance.update.update_functions:ISO unmounted successfully
2021-05-30T15:20:26.109 [3758]DEBUG:vmware.appliance.update.update_b2b:discoverLocalUpdate failed.
Traceback (most recent call last):
  File "/usr/lib/applmgmt/update/py/vmware/appliance/update/update_b2b.py", line 1434, in _discoverUpdateAt
    tempFolder)
  File "/usr/lib/python3.7/shutil.py", line 248, in copy
    copyfile(src, dst, follow_symlinks=follow_symlinks)
  File "/usr/lib/python3.7/shutil.py", line 120, in copyfile
    with open(src, 'rb') as fsrc:
FileNotFoundError: [Errno 2] No such file or directory: '/mnt/iso-contents/manifest-latest.xml'

During handling of the above exception, another exception occurred:

Traceback (most recent call last):
  File "/usr/lib/applmgmt/update/py/vmware/appliance/update/update_b2b.py", line 1640, in discoverLocalUpdatesNoException
    _discoverLocalUpdates()
  File "/usr/lib/applmgmt/update/py/vmware/appliance/update/update_b2b.py", line 1631, in _discoverLocalUpdates
    _discoverUpdateAtIso()
  File "/usr/lib/applmgmt/update/py/vmware/appliance/update/update_b2b.py", line 1607, in _discoverUpdateAtIso
    raise e
  File "/usr/lib/applmgmt/update/py/vmware/appliance/update/update_b2b.py", line 1602, in _discoverUpdateAtIso
    _discoverUpdateAt(manifestDir, packagesDir, copyFileFunc, 'iso')
  File "/usr/lib/applmgmt/update/py/vmware/appliance/update/update_b2b.py", line 1446, in _discoverUpdateAt
    raise RpmManifestNotFoundException
vmware.appliance.update.update_b2b.RpmManifestNotFoundException

so, I did the above, staged the upgrade repository this time:

Then ran the install:


Progress:

vrbc 7.6 security patch (7.6.0.46000) installation fails

installing vRBC security patch fails:

logs:

/opt/vmware/var/log/vami/vami.log
/opt/vmware/var/log/vami/updatecli.log

pg_dump: dumping contents of table "itfm_cloud_admin.vra_vm_details"
pg_dump: dumping contents of table "itfm_cloud_admin.vra_vm_details_tags"
pg_dump: saving large objects
Dump successful
Stopping VMware vPostgres: ok
MongoDB instance is already upgraded. Aborting upgrade
error: package libyui-ncurses-pkg6-2.46.1-3.4.x86_64 is not installed
error: package perl-Bootloader-YAML is not installed
30/05/2021 7:30:50 [INFO] Update status: Done pre-install scripts
30/05/2021 7:30:50 [INFO] Update status: Running installation tests
30/05/2021 7:30:50 [INFO] Running /opt/vmware/var/lib/vami/update/data/job/15/test_command 
Preparing packages...
	installing package kernel-default-4.12.14-122.26.1.x86_64 needs 4MB on the /boot filesystem
30/05/2021 7:30:51 [ERROR] Failed with exit code 65024
30/05/2021 7:30:51 [INFO] Update status: Running post-install scripts

Cause: the /boot partition ran out of space

Resolution:

Take a snapshot of the vrb appliance and perform the below:

  • SSH to vRB VA.
  • Create temp directory and move old kernel files.
mkdir /tmp/boot
cd /boot/
mv vmlinu* initrd* /tmp/boot
  • re-run the upgrade to the security build

Usage meter 4.3/4.4 vCenter server Partial collection failure: Events

Usage meter reports partial collection failure: events

Logs files: 	vccol_main.log | vccol_error.log
[2021-05-18 09:02:25]  | ERROR | ter collector thread |    com.vmware.um.vccollector.VCCollector | vCenter collector90 | Events stage raised exception javax.xml.ws.WebServiceException: java.net.SocketTimeoutException: Read timed out java.net.SocketTimeoutException: Read timed out=>Read timed out
[2021-05-18 09:02:26]  | ERROR | ter collector thread | com.vmware.um.collector.CollectionHelper | vCenter collector98 | Status (COLLECT_API_ERR) for vCenter server 7: Partial collection failure: Events
[2021-05-18 10:02:18]  | ERROR | ter collector thread |    com.vmware.um.vccollector.VCCollector | vCenter collector179 | Events stage raised exception javax.xml.ws.WebServiceException: java.net.SocketTimeoutException: Read timed out java.net.SocketTimeoutException: Read timed out=>Read timed out

Cause: Connection was closed before the data could be retrieved successfully. Usage meter requests vCenter for events, this api generally takes some time to respond either due to the huge number of events or slowly due to heavy processing on the vCenter.

Resolution: Increase timeouts
* take a snapshot of the um appliance.
* ssh into the appliance with the user usagemeter
* take a backup copy of common_utils.sh

cp /opt/vmware/cloudusagemetering/scripts/common_utils.sh /opt/vmware/cloudusagemetering/scripts/common_utils.sh.bak

* edit the config file using vi

 vi /opt/vmware/cloudusagemetering/scripts/common_utils.sh

* replace the values of the below field

=> CONNECT_TIMEOUT_MS="300000"
=> READ_TIMEOUT_MS="600000"

* save the file and restart the appliance


Note: On the vCenter side, if there are bursts of events, then this is also a likely scenario. KB https://kb.vmware.com/s/article/74607 is one among several where the burst is documented (event bursts need to be triaged from vCenter prospective)

Saltstack + vSphere: Deploying Windows VM’s with Windows Minion

Ensure that you have set up sphere provider provider, refer my previous blog https://blog.ntitta.in/?p=597

create a windows profile

/etc/salt/cloud.profiles.d/w16k.conf 

root@saltyub:/# cat /etc/salt/cloud.profiles.d/w16k.conf 
w16k:
  provider: vcsa
  clonefrom: w16k_salt 
#  devices: 
#   network: 
#    Network adaptor 1:
#     name: VM Network
#     adapter_type: vmxnet3
#     switch_type: standard
#     ip: 172.16.70.79
#     gateway: [172.16.1.1]
#     subnet_mask: 255.255.128.0
#     domain: ntitta.lab
  cluster: vSAN
  datastore: vsanDatastore
  power_on: True
  deploy: True
  customization: True
  minion:
   master: saltyu.ntitta.lab
  win_username: administrator 
  win_password: 'P@ssw0d'
  plain_text: True
  win_user_fullname: admin
  win_run_once: 'powershell.exe c:\scripts\e.winrm.ps1'
  win_installer: /salt/minion/Salt-Minion-3000.9-Py2-AMD64-Setup.exe
  winrm_verify_ssl: False

Ensure that you have the smbprotocol and pypsexec installed

pip3 install smbprotocol
pip3 install pypsexec

on the guest windows server template, ensure vmware tools is installed and create a PowerShell script in the path: c:\scripts\e.winrm.ps1, refer salt doc for more information: https://docs.saltproject.io/en/latest/topics/cloud/windows.html

New-NetFirewallRule -Name "SMB445" -DisplayName "SMB445" -Protocol TCP -LocalPort 445
New-NetFirewallRule -Name "WINRM5986" -DisplayName "WINRM5986" -Protocol TCP -LocalPort 5986

winrm quickconfig -q
winrm set winrm/config/winrs '@{MaxMemoryPerShellMB="300"}'
winrm set winrm/config '@{MaxTimeoutms="1800000"}'
winrm set winrm/config/service/auth '@{Basic="true"}'

$SourceStoreScope = 'LocalMachine'
$SourceStorename = 'Remote Desktop'

$SourceStore = New-Object -TypeName System.Security.Cryptography.X509Certificates.X509Store -ArgumentList $SourceStorename, $SourceStoreScope
$SourceStore.Open([System.Security.Cryptography.X509Certificates.OpenFlags]::ReadOnly)

$cert = $SourceStore.Certificates | Where-Object -FilterScript {
    $_.subject -like '*'
}

$DestStoreScope = 'LocalMachine'
$DestStoreName = 'My'

$DestStore = New-Object -TypeName System.Security.Cryptography.X509Certificates.X509Store -ArgumentList $DestStoreName, $DestStoreScope
$DestStore.Open([System.Security.Cryptography.X509Certificates.OpenFlags]::ReadWrite)
$DestStore.Add($cert)

$SourceStore.Close()
$DestStore.Close()

winrm create winrm/config/listener?Address=*+Transport=HTTPS `@`{CertificateThumbprint=`"($cert.Thumbprint)`"`}

Restart-Service winrm

download salt windows minion installer to the below path on the salt-master:
/salt/minion/, exe can be downloaded from https://docs.saltproject.io/en/latest/topics/installation/windows.html

wget https://repo.saltstack.com/windows/Salt-Minion-3003-Py3-AMD64-Setup.exe

Deploy Windows VM via salt:

salt-cloud -p w16k w16k-salty-minion -l debug

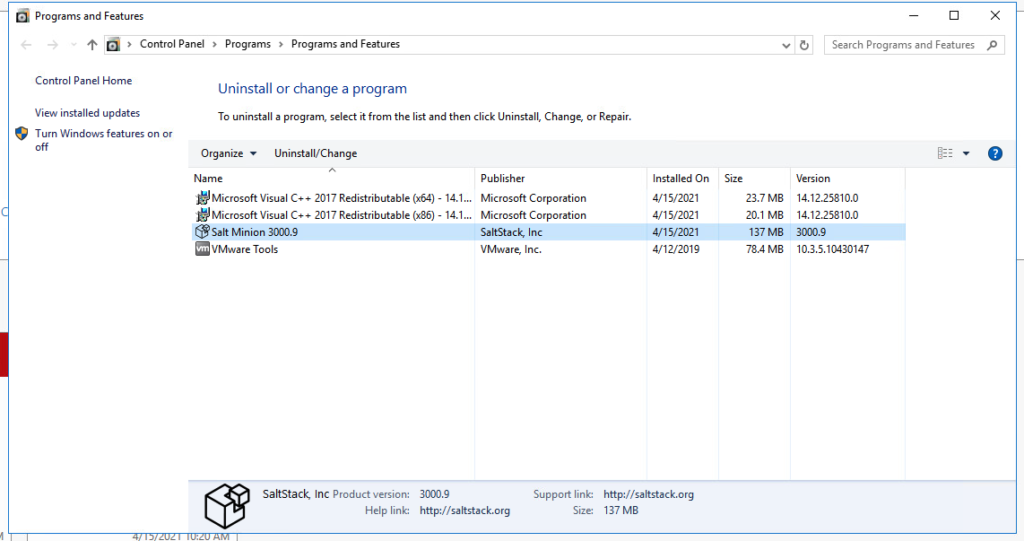
Deployed VM you can see firewall and salt minion installed:

Troubleshooting:

[ERROR   ] Unable to execute command
Traceback (most recent call last):
  File "/usr/lib/python3/dist-packages/salt/utils/cloud.py", line 1005, in wait_for_psexecsvc
    stdout, stderr, ret_code = run_psexec_command(
  File "/usr/lib/python3/dist-packages/salt/utils/cloud.py", line 956, in run_psexec_command
    client = Client(
  File "/usr/lib/python3/dist-packages/salt/utils/cloud.py", line 879, in __init__
    self._client = PsExecClient(server, username, password, port, encrypt)
NameError: name 'PsExecClient' is not defined

cause: PsExecClient module is not installed. , use pip3 to install this

adding vRA 7.6 to usage meter 4.3 fails with invalid credentials

Logs:

[2021-03-23 15:02:49]  | ERROR | t_credentials_create | com.vmware.um.vracollector.api.VRAClient | IaaS credentials error for server 15. Please correct the IaaS credentials. GET https://iis.ntitta.lab:443/repository/Data/ManagementModelEntities.svc/ProvisioningGroups failed: stream was reset: HTTP_1_1_REQUIRED=>stream was reset: HTTP_1_1_REQUIRED

[2021-03-23 15:02:57] | ERROR | t_credentials_create | com.vmware.um.vracollector.api.VRAClient | GET https://iis.ntitta.lab:443/repository/Data/ManagementModelEntities.svc/ProvisioningGroups failed: stream was reset: HTTP_1_1_REQUIRED
[2021-03-23 15:02:57] | ERROR | t_credentials_create | com.vmware.um.vracollector.api.VRAClient | IaaS credentials error for server 15. Please correct the IaaS credentials. GET https://iis.ntitta.lab:443/repository/Data/ManagementModelEntities.svc/ProvisioningGroups failed: stream was reset: HTTP_1_1_REQUIRED=>stream was reset: HTTP_1_1_REQUIRED
[2021-03-23 15:03:21] | ERROR | t_credentials_create | com.vmware.um.vracollector.api.VRAClient | GET https://iis.ntitta.lab:443/repository/Data/ManagementModelEntities.svc/ProvisioningGroups failed: stream was reset: HTTP_1_1_REQUIRED
[2021-03-23 15:03:21] | ERROR | t_credentials_create | com.vmware.um.vracollector.api.VRAClient | IaaS credentials error for server 15. Please correct the IaaS credentials. GET https://iis.ntitta.lab:443/repository/Data/ManagementModelEntities.svc/ProvisioningGroups failed: stream was reset: HTTP_1_1_REQUIRED=>stream was reset: HTTP_1_1_REQUIRED
[2021-03-23 15:14:17] | ERROR | t_credentials_create | com.vmware.um.vracollector.api.VRAClient | GET https://iis.ntitta.lab:443/repository/Data/ManagementModelEntities.svc/ProvisioningGroups failed: stream was reset: HTTP_1_1_REQUIRED
[2021-03-23 15:14:17] | ERROR | t_credentials_create | com.vmware.um.vracollector.api.VRAClient | IaaS credentials error for server 15. Please correct the IaaS credentials. GET https://iis.ntitta.lab:443/repository/Data/ManagementModelEntities.svc/ProvisioningGroups failed: stream was reset: HTTP_1_1_REQUIRED=>stream was reset: HTTP_1_1_REQUIRED
[2021-03-23 15:19:50] | ERROR | t_credentials_create | com.vmware.um.vracollector.api.VRAClient | GET https://iis.ntitta.lab:443/repository/Data/ManagementModelEntities.svc/ProvisioningGroups failed: stream was reset: HTTP_1_1_REQUIRED
[2021-03-23 15:19:50] | ERROR | t_credentials_create | com.vmware.um.vracollector.api.VRAClient | IaaS credentials error for server 16. Please correct the IaaS credentials. GET https://iis.ntitta.lab:443/repository/Data/ManagementModelEntities.svc/ProvisioningGroups failed: stream was reset: HTTP_1_1_REQUIRED=>stream was reset: HTTP_1_1_REQUIRED
[2021-03-23 15:47:09] | ERROR | t_credentials_create | com.vmware.um.vracollector.api.VRAClient | GET https://iis.ntitta.lab:443/repository/Data/ManagementModelEntities.svc/ProvisioningGroups failed: stream was reset: HTTP_1_1_REQUIRED
[2021-03-23 15:47:09] | ERROR | t_credentials_create | com.vmware.um.vracollector.api.VRAClient | IaaS credentials error for server 16. Please correct the IaaS credentials. GET https://iis.ntitta.lab:443/repository/Data/ManagementModelEntities.svc/ProvisioningGroups failed: stream was reset: HTTP_1_1_REQUIRED=>stream was reset: HTTP_1_1_REQUIRED

Resolution: Disable http2 on the IIS and then re-add the product


Instructions:
* Start → regedit
* Navigate to the folder/path: HKEY_LOCAL_MACHINE\System\CurrentControlSet\Services\HTTP\Parameters
* Under the Parameters folder, right-click the white-space, add 2 new DWORD (32-bit) values:
 – EnableHttp2Tls
 – EnableHttp2Cleartext
* Ensure both new values have been set to 0(disabled) by right-clicking the value and clicking “Modify…”
* Restart the OS.


Misc: To test iis credentials, you can perform the below curl command (run it from a different linux instance as UM has enforced FIPS which disables MD5 for ntlm based authentication)

curl --ntlm --user 'Administrator':'VMware1!' https://iis.ntitta.lab/repository/Data/ManagementModelEntities.svc/ProvisioningGroups -k


Once the above is done, you are likely to run into a second issue, Logs:

[2021-03-26 15:22:01]  |  WARN | t_credentials_create | vmware.um.common.http.LoggingInterceptor | GET /repository/Data/ManagementModelEntities.svc/ProvisioningGroups failed with Too many follow-up requests: 21 Too many follow-up requests: 21

[2021-03-26 15:22:01] | ERROR | t_credentials_create | com.vmware.um.vracollector.api.VRAClient | GET https://iis.ntitta.lab:443/repository/Data/ManagementModelEntities.svc/ProvisioningGroups failed: Too many follow-up requests: 21
[2021-03-26 15:22:01] | ERROR | t_credentials_create | com.vmware.um.vracollector.api.VRAClient | IaaS credentials error for server 5. Please correct the IaaS credentials. GET https://iis.ntitta.lab:443/repository/Data/ManagementModelEntities.svc/ProvisioningGroups failed: Too many follow-up requests: 21=>Too many follow-up requests: 21

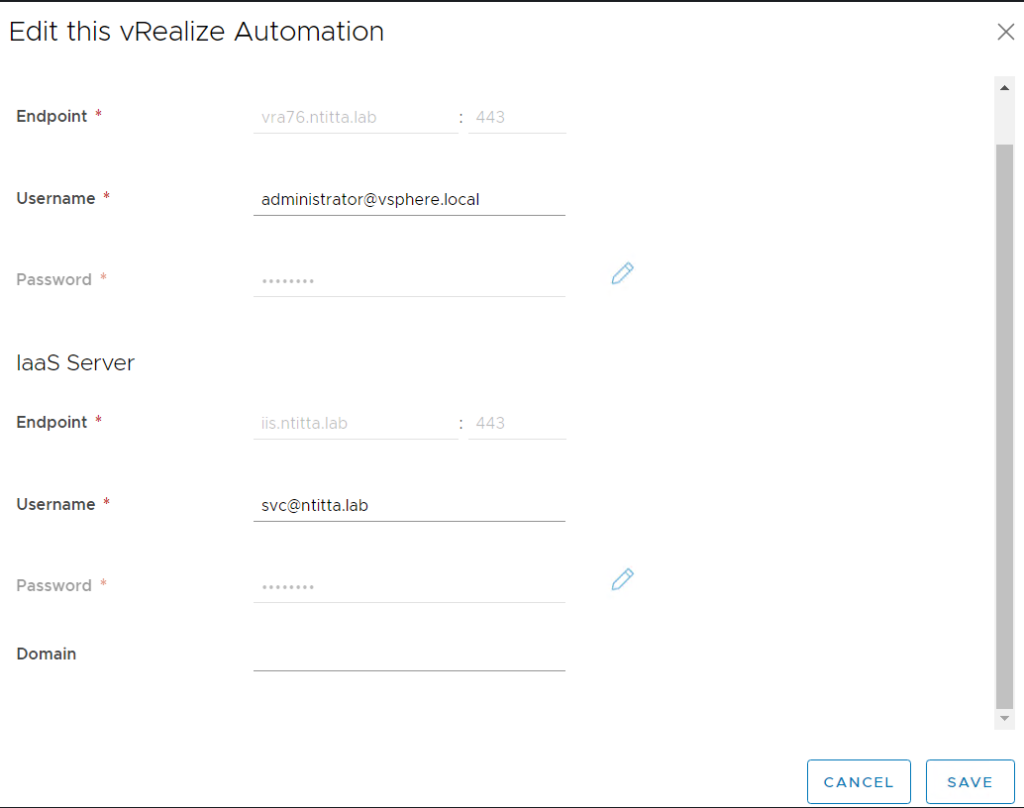
To resolve the above, Edit the vRA credentials in usage meter and under the IIS credentials, write the user name in the format: [email protected] and leave the domain field blank

This image has an empty alt attribute; its file name is image-1024x808.png

if you see the below:

[2021-03-29 11:29:03]  |  INFO | t_credentials_create | com.vmware.um.vracollector.api.VRAClient | Start test credentials for vRA Cafe server '16'

[2021-03-29 11:29:03] | ERROR | t_credentials_create | com.vmware.um.vracollector.api.VRAClient | Server '16' failed to authenticate API endpoint identity/api/tokens on server 16 returned HTTP status 400

this means that the vRA credentials are incorrect. Try setting the user name as : administrator and then save.

upgrade vRA 8.2 to 8.3

Upgrade LCM

Log in to LCM> Lifecycle operations> Settings> System upgrade

Create snapshot

Once snapshot is done, Click on Check for upgrade,

vRLCM will reboot as a part of the upgrade. Wait patiently… (go have a coffee)

On successfull upgrade, we should see :

Add vRA package repository to LCM

Download vRA 8.3 upgrade repository from https://my.vmware.com/group/vmware/downloads/details?downloadGroup=VRA-830&productId=1116&rPId=59213

copy the ISO to LCM, /data directory

Now, Go back to LCM> Lifecycle operations> settings > Binary mapping>Add product binaries, enter path in base location and then cick on discover

Clock on the prelude(the one we uploaded) and click on add

wait for the import task to compleate. You can take a look at the task by clicking on requests > Click on the most recent request

On successfull import, you should see it in the binary mapping:

Upgrade VRA:

Now that the upgrade packages have been uploaded to LCM, Go into LCM > LifeCycle Operations > Environments > Click on “view details” for the vRA environment.

Triger inventory sync:

Go grab a coffee!!, Typically at this point its just waiting for vRLCM to perform the upgrade.

Click on upgrade:

Run pre-check

wait for pre-check to complete: (takes about 3-10 min)

submit upgrade task

Now, Go grab a cup of coffee, This step generally takes a while.

Getting started with salt stack and VMware (vCenter)

Salt stack (salt open) is an opensource utility that can be used to orchestrate vCenter tasks. In this blog, I will guide you on how to install, and set a basic clone operation with salt stack.

Install:

pre-requisite: Linux VM (cent os or ubuntu), I’ve used Ubuntu 20.4 for the below example.

Log into ssh of the ubuntu VM, and add salt stack repository:

wget -O - https://repo.saltstack.com/py3/debian/10/amd64/latest/SALTSTACK-GPG-KEY.pub | sudo apt-key add -

add key: in /etc/apt/sources.list.d/saltstack.list

nano /etc/apt/sources.list.d/saltstack.list

add the below line on the file:

deb http://repo.saltstack.com/py3/debian/10/amd64/latest buster main

update repository

sudo apt update

install stalt stack

sudo apt-get install salt-master salt-minion salt-ssh salt-syndic salt-cloud salt-api -y

Edit vi /etc/salt/master and add the salt master IP address to interface

interface: 172.16.8.9

Configuring VMware provider

Pre-requisite: Pyvomi must be installed

sudo apt install python3-pip
pip3 install pyVmomi

Confirm pyvomi is imported:

python3 -c "import pyVmomi" ; echo $?

Setup cloud provider:

create /etc/salt/cloud.providers.d/vmware.conf with the below contents: (replace user, password and url as per what you have in your enveronment)

#/etc/salt/cloud.providers.d/vmware.conf
vcsa:
 driver: vmware
 user: '[email protected]'
 password: 'P@ssw0rd'
 url: 'vcsa.ntitta.lab'
 verify_ssl: False 

homelabs:
 driver: vmware
 user: '[email protected]'
 password: '*************'
 url: 'vcsa.ntitta.in'

now you can test the above config by querying for images using below command:

salt-cloud --list-images vcsa

Okay, Now, lets set up profiles: Create /etc/salt/cloud.profiles.d/vmware.conf with the below content:

#/etc/salt/cloud.profiles.d/vmware.conf
ubuntu20:
 provider: vcsa
 clonefrom: ub20
 cluster: vSAN
 ssh_username: root
 password: 'P@ssw0rd'

update salt config

 salt-cloud -u

Test a deployment:

salt-cloud -p ubuntu20 test-stal1-vm

Troubleshooting: (enable debug by using the below )

salt-cloud -p w16k salty-w16-test-1 -l debug